Speed up your WordPress Custom Post Type Setup
Published by: Tim Bakkum,
WordPress is a great blogging platform right out of the box that is easily extendable into a complex website. However you might find that the standard content types that come with WordPress, posts, pages, attachments, revisions and navigation menus, are not suitable enough for more complex content once you start expanding your WordPress blog. The Custom Post Type function allows you to easily create your custom content types for content that doesn’t belong on your blog or on a page, such as a project, a recipe or an event content type.
Registering your post type
Registering your custom post type is achieved through the registerposttype function. This function takes two arguments: the post type "code" name without any spaces or capitals and an optional array of options. The most basic configuration of a new custom post type would be this:
function register_custom_post() {
    $args = array(
    'public' => true,
);
    register_post_type( 'my-custom-post-type', $args );
}
add_action( 'init', 'register_custom_post' );
Put this code in your theme’s functions.php file and you should see a new menu item in your WordPress admin. You could leave the array passed as the second parameter empty, except for the public parameter, which allows the post type to show up in the admin interface (its default is set to false). But by doing so, all the options will take on the default values, making your new custom post type indistinguishable from the regular blog post type that comes with WordPress. You should take the time to customise the options of your custom content type, to not only make it stand out in the backoffice from other content types by providing proper labels and titles, but also to tweak the behaviour and capabilities of your newly created custom post type. You can, for example, change the URL (slug) or determine whether it should behave like a page (hierarchical) instead of like a post. All options are available and described in the WordPress Codex.
Register in a theme or a plugin?
In the previous section, I suggested putting your code that registers your post type in the functions.php file of your theme. In doing so, whenever you switch to a different theme, your custom post type won’t appear in the backoffice anymore and won’t be accessible in WP_Query’s, simply because the functions.php file of the previously activated theme won’t be read anymore. If you want to ensure the portability of your custom content across themes, you can also register your custom post type as a plugin. Plugins can be activated independently of a theme, so you won’t lose access to custom content types when switching themes. If you expect that you or the end-user of the website you’re building will switch to another at any point in the future, this might be safer option. If you are worried about the administrator deactivating custom post type plugins, you can even put your code in must-use plugins (mu-plugins), which are plugins that are automatically loaded everywhere and that can’t be disabled via admin. More on that in a future article.
Speeding it up
Figuring out how to use these options and then writing the code manually can be a lengthy process, because there are simply too many of them to learn them all by heart. When building more complicated websites using WordPress, you might find yourself having to register multiple custom content types. This is where time really adds up. Let’s figure out how to speed this up! Numerous tools exist that help accelerate the configuration of your custom post type. Once you’ve practised with the basic syntax of the registerposttype function, I recommend that you use one of the following tools to save time and avoid possible errors.
Online configuration wizards
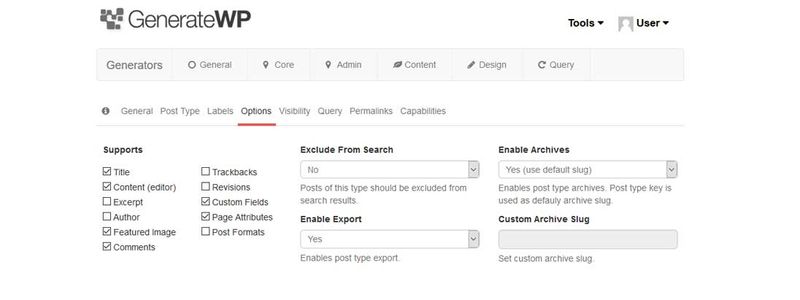
There are several online step-by-step configuration wizards that help you customize your registerposttype parameters. Instead of typing out the same code over and over, simply fill out the fields and generate perfect code that you simply copy and place into the functions.php file of your theme. Once you start getting experienced with the different custom post type options and their default, you only have to fill out the options that you want to be different from their default value. The Wordpress Custom Post Type Generator by O3 Creative is one of those online wizards. Filling in the form updates the generated code in real-time, ready for you to copy and use in your project. GenerateWP propose an array of configuration wizards for WordPress code, amongst which a custom post types generator. Its multi-step approach to the lengthy form make it very user friendly. Just don't forget to click the "update snippet" button when you are done!
WordPress plugins
You can also choose to use a plugin that allows you to configure your custom post types directly in your administrator interface. These kind of plugins registers your post type for you without having to write any php. The added benefit of this method is, that, when you change your theme, the custom post types defined via the plugin don’t disappear from your administrator interface. They are not bound to your theme, because they are defined outside of a functions.php file. This also allows anyone with sufficient access rights to create and modify content types. Depending on the project and/or client this might be an option for you. Some of the most notable plugins are: Types, MB Custom Post Types and Custom Post Type UI.
Types
The Types plugin is a very complete plugin that allows you to create and manage your custom post types in your WordPress admin. In addition to that, Types also allows you to create custom fields and create and manage your custom taxonomies (categories/tags) for your content types. Types doesn't let you manage custom post or taxonomies that are defined elsewhere in your code though!
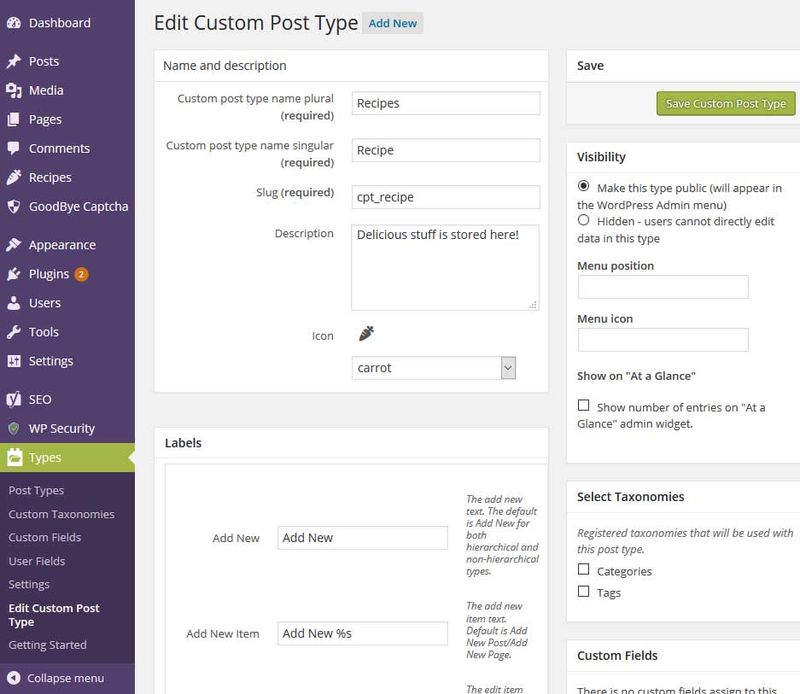
One of the admin pages of the types plugin : editing a custom post type
MB Custom Post Type
The Meta Box Custom Post Type Plugin by Meta Box does what Types does, but I find their interface slightly more user friendly. For example it shows you the icons you can choose from visually and it has a nifty time-saving auto-suggest function for you labels based on the title you provide. Meta Box provides plenty of other plugins, both free and premium, to extend and manage your content types further. https://www.youtube.com/watch?v=KG_8MF9xw6E&feature=youtu.be
Custom Post Type UI
The Custom Post Type UI plugin by Webdev Studios is also a much used plugin for creating custom post types and custom taxonomies as well. The interface might not be as intuitive as the two previous plugins, but I found the import/export section much easier to find and use than with the two previous plugins. Which is an important aspect when choosing your plugin, depending on the nature of your project.
WordPress CLI
If you are familiar with the command line, you can try generating your custom post types by simply typing a single command using the WordPress Command Line Interface (CLI).
wp scaffold post-type my-custom-post-type-nameWithin seconds, this command will output all the code you need on the command line. Add flags to your command to tell where and how to store the generated code, either directly in a file in your theme or in a separate plugin directory for cross-theme use. The advantage of using the command line to generate your code, is that no copy-pasting is needed (when using the proper flags) and it’s super fast (loading WordPress admin pages can be quite slow on local development environments in my experience!). Below is an example of how I used the WP-CLI to generate the code for registering a project custom post type for my portfolio pages and to store it within my plugin 'register-custom-post-types' (folder must be previously created).
wp scaffold post-type cpt_project --label="Projects" --dashicon=portfolio --plugin=register-custom-post-types
Success: Created D:\Program_Files\EZPHP\data\localweb\bedrock\web\app\plugins/register-custom-post-types/post-types/cpt_project.php
Within 2 seconds, this command generated the 'cpt_project.php' file in a 'post-types' folder within my plugin folder. (Note that I'm using bedrock here, so the folder structure is a bit different. Normally the WP-CLI will find the right location of your plugins folder within your WordPress installation.) This file contains the following code:
function cpt_project_init() {
    register_post_type( 'cpt_project', array(
        'labels'            => array(
            'name'                => __( 'Projects', 'register-custom-post-types' ),
            'singular_name'       => __( 'Projects', 'register-custom-post-types' ),
            'all_items'           => __( 'All Projects', 'register-custom-post-types' ),
            'new_item'            => __( 'New Projects', 'register-custom-post-types' ),
            'add_new'             => __( 'Add New', 'register-custom-post-types' ),
            'add_new_item'        => __( 'Add New Projects', 'register-custom-post-types' ),
            'edit_item'           => __( 'Edit Projects', 'register-custom-post-types' ),
            'view_item'           => __( 'View Projects', 'register-custom-post-types' ),
            'search_items'        => __( 'Search Projects', 'register-custom-post-types' ),
            'not_found'           => __( 'No Projects found', 'register-custom-post-types' ),
            'not_found_in_trash'  => __( 'No Projects found in trash', 'register-custom-post-types' ),
            'parent_item_colon'   => __( 'Parent Projects', 'register-custom-post-types' ),
            'menu_name'           => __( 'Projects', 'register-custom-post-types' ),
        ),
        'public'            => true,
        'hierarchical'      => false,
        'show_ui'           => true,
        'show_in_nav_menus' => true,
        'supports'          => array( 'title', 'editor' ),
        'has_archive'       => true,
        'rewrite'           => true,
        'query_var'         => true,
        'menu_icon'         => 'dashicons-portfolio',
    ) );

}
add_action( 'init', 'cpt_project_init' );

function cpt_project_updated_messages( $messages ) {
    global $post;

    $permalink = get_permalink( $post );

    $messages['cpt_project'] = array(
        0 => '', // Unused. Messages start at index 1.
        1 => sprintf( __('Projects updated. View Projects', 'register-custom-post-types'), esc_url( $permalink ) ),
        2 => __('Custom field updated.', 'register-custom-post-types'),
        3 => __('Custom field deleted.', 'register-custom-post-types'),
        4 => __('Projects updated.', 'register-custom-post-types'),
        /* translators: %s: date and time of the revision */
        5 => isset($_GET['revision']) ? sprintf( __('Projects restored to revision from %s', 'register-custom-post-types'), wp_post_revision_title( (int) $_GET['revision'], false ) ) : false,
        6 => sprintf( __('Projects published. View Projects', 'register-custom-post-types'), esc_url( $permalink ) ),
        7 => __('Projects saved.', 'register-custom-post-types'),
        8 => sprintf( __('Projects submitted. Preview Projects', 'register-custom-post-types'), esc_url( add_query_arg( 'preview', 'true', $permalink ) ) ),
        9 => sprintf( __('Projects scheduled for: %1$s. Preview Projects', 'register-custom-post-types'),
        // translators: Publish box date format, see http://php.net/date
        date_i18n( __( 'M j, Y @ G:i' ), strtotime( $post->post_date ) ), esc_url( $permalink ) ),
        10 => sprintf( __('Projects draft updated. Preview Projects', 'register-custom-post-types'), esc_url( add_query_arg( 'preview', 'true', $permalink ) ) ),
    );

    return $messages;
}
add_filter( 'post_updated_messages', 'cpt_project_updated_messages' );
Pretty effective if you ask me. Just a simple php include away from registering your post types!
Further customisation
Custom content fields
Some of the plugins we discussed, like Types, already include the ability to add custom fields to all different post types on your site. Once you are done creating and customising the code for the registration of your custom content types, the next step will probably be the configuration of additional custom fields for you custom content type, as the standard fields (title and wysiwyg editor basically) probably aren’t enough. There are others plugins as well that will easily allow you to do this, like Advanced Custom Fields. More on configuring custom field for WordPress as well as why you should in a future article.
Conclusion
Configuring your custom post types can be a lengthy process. That’s why, once you get the basics of the necessary syntax, you can try to reduce the time spent on this task by using one of the three methods: online configuration wizards, WordPress plugins or the WordPress command line interface. There are lots of resources out there for WordPress, so I always try to find the tools that allow me to spend less time on recurring, repetitive tasks and focus on the actual development of the website. I recommend the usage of tools and plugins as long as you don’t lose (too much) control over the generated code. This not only holds true for registering custom post types, but also for registering taxonomies, creating option pages, plugins, etc. I personally feel that finding and using tools that do the repetitive and time-consuming stuff for you, is less prone to error and speeds up your overall WordPress workflow. Just pick the one you feel most comfortable with. You might even use a combination of tools, depending on what is convenient at that time. How do you go about the repetitive registering task, like custom posts, in WordPress?